After building your course, you need to add assignment rules so the right learners have access to complete it.
It's important to remember if your course is 'live' it will appear immediately for your learners. To avoid this, go back and change the course status to 'under construction' before adding the assignments - you can do this in the 'course details' pane.
When you have an optional course that you want specific learners (a group, groups or named individuals) to have access to, follow the steps below.
Important: Optional assignments to groups will make the course available to all learners in the group, and any who join the group in the future. Those who leave the group may no longer have access to the course if they have not started the course and if they are not assigned it via any of their other groups.
1. Go to the Assignments pane
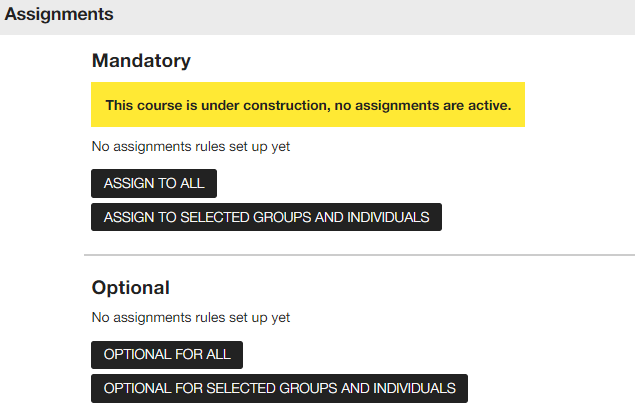
2. Click on Optional for selected groups and individuals - there are two ways to assign:
| Assign by group |
You can select the group(s) you want to assign the course to |
| Add individuals |
You can select specific individuals you want to assign the course to |
If you have used the Effective Date option when creating the course, this will not apply to the optional assignment you make.
3. Click the apply button - this will apply the assignment rules and you can click 'x' to come out of the pop-up box. It's worth remembering if you have got a little confused with the boxes you have selected it might be easier to click the 'x' and start again rather than applying the assignment rules incorrectly.
4. Check the assignment rules - when you return to the assignment pane you can see how the course will be assigned, check the number of learners and click into the list of names. If something doesn't look quite right, click on the Edit button to review and make any changes.
5. Select the approval process - there are a number of approval options you can choose from:
|
No approval required for optional courses |
The learner can select and complete the course without requesting approval. |
|
Manager only |
The Line Manager or Group Manager will be notified in the 'My Teams' section to approve the request. |
|
Central only |
The Central Administrator will be notified in the 'My Teams' section to approve the learning request. |
|
Both manager and central |
Line Manager or Group Manager will be notified in the 'My Teams' section to approve and then the Central Administrator will be notified to approve the learning request. |
6. Set the criteria of the approvals process - if you select any of the three options that require an approval you will be presented with the box below to complete:

7. Change the status to 'live' - if your course is 'under construction', the status needs to be changed to 'live' for the assignment rules to be effective.
Let's have a look at Assign by group in more detail:
Using the drop down list select the group you want to assign the course to e.g. by location, by department, by role. You can then filter that group e.g. remove a department or you can add to the group e.g. add a job role.
Let's look at some examples:
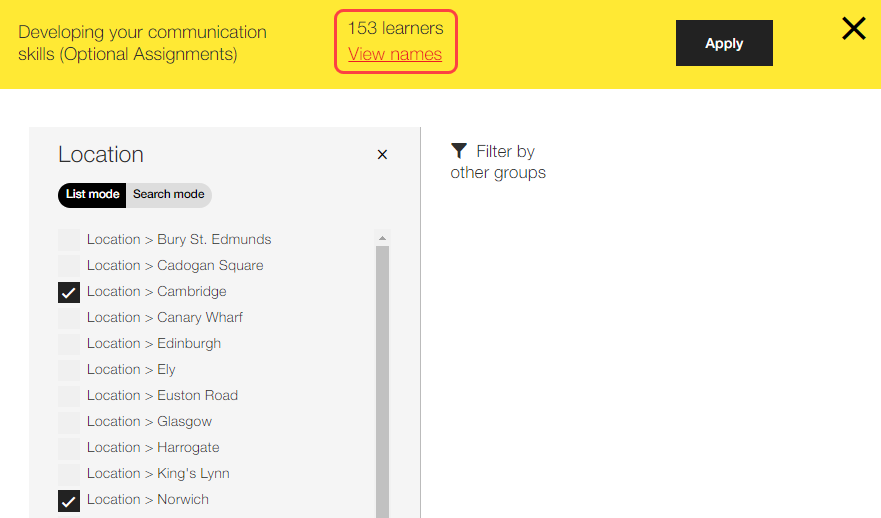
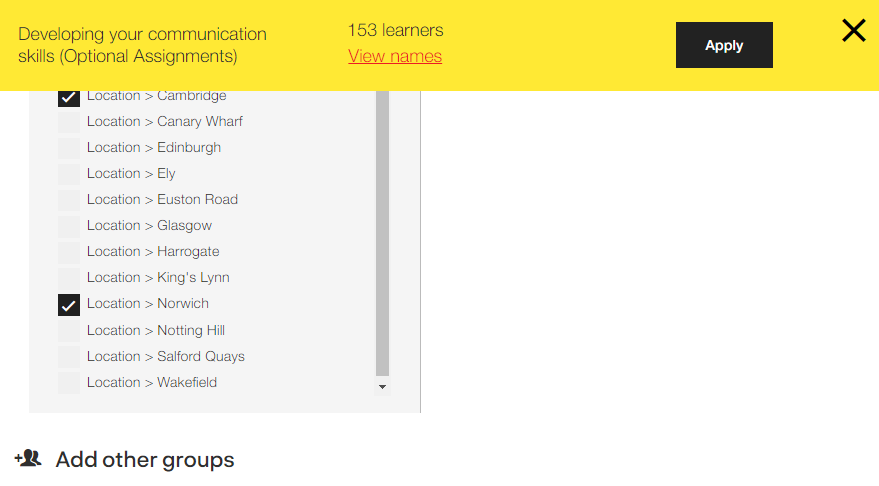
Example one - you want to make the Developing your communications skills course available to your learners in the Cambridge and Norwich locations.
1. Select Location from the drop down list

2. Place a tick in the box next to Cambridge and Norwich - you will notice the number of learners has changed to 153 learners and you can view the names on the list.
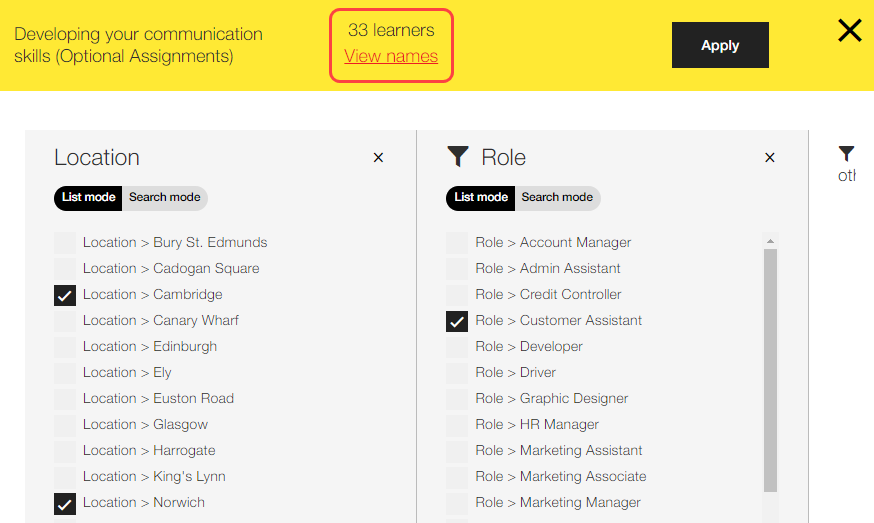
Example two - you want to make the Developing your communications skills course available to your learners in the Cambridge and Norwich locations but only those who have the job role 'Customer Assistant'.
1. Select Location from the drop down list
2. Place a tick in the box next to Cambridge and Norwich
3. Click on Filter by other groups and select Job role

4. Select Customer Assistant - you will see the number of learners has reduced because you are filtering out the learners in the two locations who you don't want to make the course available to
Example three - you want to make the Developing your communications skills course available to your learners in the Cambridge and Norwich locations plus any other learner in other locations that work in the Customer Services department.
1. Select Location from the drop down list
2. Place a tick in the box next to Cambridge and Norwich
3. Click on Add other groups and select Department
4. Click on the Customer Service department - you will see the number of learners has increased because you are adding all those learners who work in Customer Services

See also...