30 September 2019
Making your own training video
Video connects us with a story in a way that’s hard to match through other forms of communication.
You can use it to capture powerful first-hand testimony. Share a colleague’s explanation of best practice. Experience an organisation’s vision and values. Get it right, and you bring your learning to life with engaging, informative content that feels immediately relevant – and real
And with modern technology, it’s easy. Right?
Well, actually – no.
Yes, anyone can pick up a smartphone or digital camera and start recording. You can get fantastic high-definition images out of a device that’s small enough to keep in your pocket. But if you’ve ever tried to make your own video content, you’ve probably found that it’s not that simple.
Most people have an instinctive understanding of what looks right. We know how TV is supposed to look — and our brains are astonishingly good at spotting mistakes. If the framing is ugly, we notice. We expect to see handheld camera shots – but not if they’re unacceptably shaky.
A viewer might not be able to tell you why something looks wrong – they just know that it does. And that’s because we expect professional video to stick to a range of conventions. Broadcasters enforce high standards – and that makes it all the more obvious to learners when you hit them with something amateurish.
“A viewer might not be able to tell you why something looks wrong – they just know that it does.”
But if you can learn from those familiar production values and start using them in your own work, then you’ll find that DIY video can be a very effective option.
Filming a basic interview
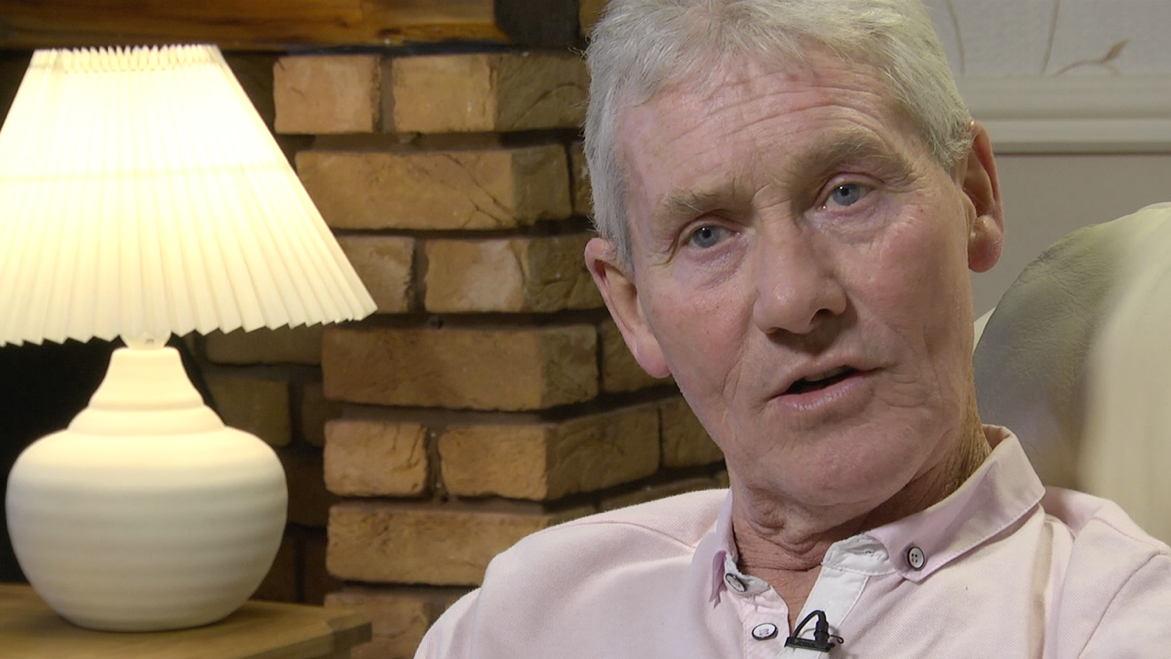
Let’s think about one of the most common scenarios for a video producer: recording a ‘talking head’ interview with a single person. This is a skill that’s well worth cultivating, because you can use it as the basis of almost any content. So where do you start?
Think about the tools you have available. Are you using a smartphone? A digital camera? A ten-year-old MiniDV camcorder? That device’s features are going to dictate your approach.
And whilst you might think that pictures come first, the reality is that your ability to capture audio is going to have a big impact. Poor quality sound is an immediate turn-off for learners.
If you can plug in an external microphone — probably a little tie-clip like the Rode smartLav (around £40) – then you’ve got a lot more flexibility. But that won’t be possible with most small cameras. Usually they have no input sockets, so you can only use the built-in microphone.
This can be a big limitation, and you need to take it into account when you plan your filming. If the location’s noisy, the microphone will pick up everything going on in the background. The camera doesn’t know which sounds you want to focus on – so there’s a good chance it will automatically balance things out so that the interviewee and the background noise are at the same volume. That makes it much harder for viewers to tune in to your interviewee.
Control your audio
So how can you get better audio? Think about what you can control.
You can pick a quiet location, with decent acoustics. Try not to use a busy corridor. Or a road.
You can move your microphone – or your camera, if the microphone is built in. Putting it closer to the interviewee will give you a better result, because you'll boost their voice level in relation to the background noise.
You can minimise background noise. Close the doors and windows. Switch off the air conditioning, if possible. Ask the maintenance team to switch off their drill.
Wind noise is always tricky. If you're planning to film outside with basic gear, test it first. You may find that the camera struggles to cope.
Can you plug headphones into your camera? If you can, you should. Phone users are usually luckier than 'proper' camera users with this, because they'll have a headphone socket. Even a basic pair will let you monitor how the recording will sound to the people watching your video. If you don’t listen, you won’t find out how well it worked until you play back the clip.
Adding pictures
Now let's think about making pictures to go with the audio. Your job is to find a shot that looks as good as possible – whilst giving the camera a chance to perform well.
You can make a basic camera or a smartphone do a much better job just by using something to support it. Handheld filming is hard – particularly for an interview – so the simplest way to improve is to invest in a basic tripod or monopod. You don't have to spend much. If you're filming with a phone, you'll need a tripod mount as well. The Glif (£25) is a clever design.
Look for a location that lets you control the audio – and ideally you also want a backdrop that provides context and contributes to the story. Make a decision: would you rather have a quiet (but dull) meeting room, or an interesting (but noisy) open-plan area?
Think about lighting, too. Natural light is more flattering than an overhead bulb, but you don't want harsh, glaring sunshine. The soft, steady light of a cloudy day is perfect. If nature doesn't cooperate, or the window's in the wrong place, work with whatever the room has to offer. Remember you can use the curtains or blinds to adjust the light.
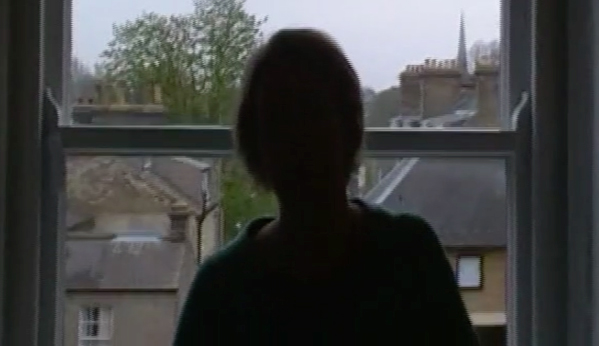
Your camera might not give you much control over the image, so find out what works. Use your eyes: if the picture looks good – not too bright, not too dark, accurate colours – then you've got it right. One key rule is that it's almost impossible to film someone standing in front of a window: the camera will end up recording a silhouette that looks like a witness interview from Crimewatch. Turn everything around so that the window is behind the camera.
When you're composing a shot, think about what you see on TV. It's landscape, not portrait, so hold your phone the right way round. Talking heads are often filmed as a 'medium close-up' – broadly speaking, that means from the chest up.
Look at the eye level. The eyes should be about a third of the way down the screen, and roughly the same height as the camera, not looking up or down. The interviewee is making eye contact with the interviewer, not looking directly into the camera. And they need some empty space in the shot to 'look into'. This kind of framing tends to feel right.
By putting the interviewer right next to the camera and asking the interviewee to focus on the person rather than the lens, you can get the eyeline right.
Think about the zoom control. If the camera is going to wobble at all – because you're hand-holding it, or using a monopod – then zoom out as far as possible to keep camera shake to a minimum.
Find out how focusing works on your camera. If it's completely automatic, all you can do is check that the camera is picking the right part of the picture to focus on. If you have some manual control, make sure the subject is sharp.
Finally, remember that if you're using the built-in microphone, the camera position will affect the sound. You need to find the right compromise – and audio quality should probably come first. It's worth recording a quick test and playing it back to check how it looks and sounds.
Ready to record
All set? From a technical point of view, this is the easy bit.
If you're using headphones, keep them on. Check the interviewee is happy and that they're looking in the right direction. Press record. Is the camera running? Make eye contact, and start.
This article isn't going to teach you to interview. Just remember to be clear about what you want – and to have a plan. If you're in control of the situation then you can help your interviewee to perform well.
You'll probably want to glance at the screen every so often to check that the picture still looks good. Has the interviewee moved? Has the light changed? Is the camera still running? Breaking eye contact is tricky, but it's better to spot a problem – and fix it – than to record something you can't use. Keep listening, too. Has that drilling started again?
And keep everything nice and steady. Don't fiddle with the camera. Leave the zoom control alone. Relax.
What next?
Even the best interview needs some editing. Maybe you just want to find a single soundbite – or you need to tidy up the recording by trimming off the start and end.
Any software, however basic (Windows Movie Maker, iMovie) will let you do that. You don't have to get into fancy post-production. Just learn how to transfer the material from the camera to your computer and then clip out the bits you want.
“It takes practice. Ask people if you can film them. Keep using your camera. Figure out what works for you.”
Using an editing program should also mean you can export your interview in the format you need. If you're putting it online, file size is important. For an e-learning module, you probably don't need full HD 1920x1080 video.
Putting it into practice
Look at a room and imagine that you've been asked to record an interview. You've got limited time to set up and film. Where could you put the camera? How would you arrange the furniture? Would your interviewee sit down or stand up?
It takes practice. Ask people if you can film them. Keep using your camera. Figure out what works for you.
When you're watching TV – or a video – pay attention to the output. What can you see? How did they do that? Where was the interviewer? Was it lit through the window or with artificial light? How could you set up that shot?
The power of video comes when sound and pictures combine to create something more than either of them can give alone. But it doesn't work when the technology gets in the way. Ugly camerawork is unlikely to deliver good results.
To get it right, you need to become confident with your tools – and then you can focus attention on the person in front of the lens.
Your technology and your technique will work together to make the camera an effective channel for communication.
James Woodman is a consultant at Acteon Communication and Learning. He specialises in video production, and also runs bespoke workshops for organisations wanting to improve their in-house video communication skills.